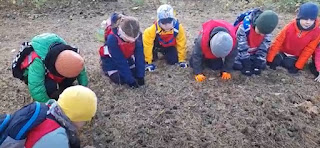
On 22.04. Earth Day, the children from the kindergarten Detelina planted flowers and trees in the yard of the kindergarten.
They dug with their hands in the ground, felt the ground
and connected with it!


On 22.04. Earth Day, the children from the kindergarten Detelina planted flowers and trees in the yard of the kindergarten.
They dug with their hands in the ground, felt the ground
and connected with it!
CHILDREN AGE: 5-6 years
OBJECTIVES: The child can move silently and notice the nature around them. The child knows why you can't pick the plants beside the trail. The child makes co-operation with group members and listens the group leader. The child looks, compares, touches and feels trees. The child takes some nature materials with them.
TOOLS: big pictures from different trees. Our senses: vision, listening, smell, touch, feel, perceive.
PREPARATION: in the morning meeting they make groups and pick the group leader. The groups picks one tree and describes it. Before the hike to the forest we eat something healthy.
ACTIVITY: When we arrived to the forest the children understood that if they move silently they can see and hear more of the forest life! We noticed blackbird who went on with its activities. The children noticed familiar and unfamiliar plants. We listened for the bird song and tried to figure out what the ants are doing now.
We also run into other group of children. But they did not see us until we were very close to them. And that was because we moved very silently!
The unpleasant thing was that the forest was full on dog feces. And you had to walk very carefully.
 |
| Listen, which animal passes by |
 |
| Act like animal and hide your food! |
 |
| Feel the silence and listen forest sounds. |
THEME: ESTONIAN FOREST (project)
CHILDREN AGE: 4-6 years
OBJECTIVES: The child knows the worth of the forest in our nature. The child knows trees in Estonia. The knows the names of the trees and tells them (pine, fir, birch). The child knows what the tree needs to grow (soil, water, light). The child watches different pictures and books from trees. The child is active in discussions. The child draws favorite tree. The child cuts out and glues it on the given base paper. The child finds things made of wood in the group. The child knows that pen is made of wood. The child actively participates in doing group art work (tree from leftovers from sharpening pens). The child knows how to use digital storytelling pen. The child knows how to play digital game about forest and nature.
TOOLS/MATERIALS: different books and pictures about forest; wax chalks, paper, base paper, scissors, glue; pen, PVA-glue, leftovers from sharpening pens, crepe paper, base card; digital storytelling pen and its sets about nature.
ACTIVITY:
- Pictures - looking, discussions
3/4 from Estonia is covered with forest and bog. Forest is a part of our culture, our way of thinking. Estonia is rich of its untouched nature.
With children - our forest values - made a concept map.
Then we discussed what is forest protected areas. We reminded concept nature protection. We found out that there is 3000 trees per person in forests. The average tree age is about 60 years. We discussed that who has planted trees in the forest. Talked about different forests is Estonia. The most we have pine trees, then comes birch, fir and so on. Then we looked the books about forests.
We found out that from one average tree you can have 70 kg paper or 10 000 sheets of paper A4. Discussion, is it a lot or not?
Then we discover the trees on our kindergarten yard. Like the rowans are planted by children who graduated our kindergarten 13-15 years ago. And the birch trees are older then 60 years. We compare them and we name adjectives about them.


- Drawing
The children draw the tree that they like the best, cuts it out and glues on the base paper to make collaborative art work. Together it is a forest.

- Discussion
What is made of wood? Find things from the group room what is made of wood.
Pens - are made of soft wood, without branch knot and is easily cut that's why it is easy to sharpen them. And all of the pen ends up in trash. We don't use it. Or can we use it? What can we do that less of pen ends up in trash? To use pen wisely, cut less and not so often. But how can we use the leftovers?
- Art work
In collaboration we made a tree from the pen sharpening leftovers. We drew a tree, put some PVA-glue on it, then on the glue went pen sharpening leftovers and we decorated it crepe paper leaves.


- Embedding the topic - on free time
Children can use the digital storytelling pen, read and look books about nature, play board games of nature and so on.

THEME: Rain music
CHILDREN AGE: 3-4 years
OBJECTIVES: The child imitates rain noise with fingers (quietly and hard). The child knows that they can make music instruments from the nature materials gathered from the forest. The child knows what is rain instrument and tries to play it. The child compares different rain instruments sounds.
MATERIALS/TOOLS: empty plastic bottle with lid, different sizes and thickness branches (to fit inside the bottle), little rocks, peaces of cones.
PREPARATION: gather different branches, rocks and cut little peaces from the cones.
ACTIVITY: The teacher discusses about the sound of rain with children. Then they try to imitate it together with fingers. Loud and heavy and then quietly and softly. Then the teacher shows instruments that she herself has made. They explore the inside of it. Then all the children can make their own rain instruments. They choose the branches, rocks, peaces of cones and so on. They put them inside of the plastic bottle and put the lid on. Then they all play them. They try to hear if they sound the same or different. Then they try to make heavier and softer noise. They also put some music on and try to play the rain instrument.
THEME: What is forest? Lets find out! (project)
CHILDREN AGE: 3-4 years
OBJECTIVES: The child knows what is forest. The child can mention some plants/trees/flowers and animals/birds/bugs that are in forest. Activity 1: The child learns about a drawing program in tablet and tries to use it. The child is brave and introduces his/hers drawing to others. Activity 2: The child is active and brave in the forest. The child puts gathered nature materials in the art work. The child looks at art work. The child is active to give opinion about the most exiting treasure that is worth exploring further. Activity 3: The child knows pine cone (where it grows, why some cones are open and some closed). The child finds pine cones from the forest and compares them (size, color, openness). The child participates actively doing the experiments. The child makes flowers from the pine cones and makes Mother's Day cards from them.
TOOLS/MATERIALS: Activity 1: tablet, paper, pen, printer, clothespin to put pictures up. Activity 2: every child has own treasure collecting bowl, name sign, bag, vests, table, chairs, Y-shape branches, yarn. Activity 3: drawing or showing, pine cones, for the experiment: bowl with water, jar with hot water, empty jar, for arts: pine cones flowers, colors, brushes, hot glue, paper for the cards.
PREPARATIONS: Activity 1: charge tablet, download app "Paint for kids". Activity 2. find bowls for the treasures, make name signs, gather Y-shape branches from the forest, twine yarn on it different colors. Activity 3: find or draw pictures with pine tree, cones, seeds, branches. Print it out. Out ready on table bowl with water and empty jars. Cut pine flowers with tongs.
ACTIVITY:
Activity 1: Individual activity. so that the children don't copy each other they will go to teacher to draw with the tablet program one by one. Firstly the teachers explains the program opportunities: how to draw with finger and how to choose colors. Then teacher asks to draw a picture on theme "What is forest?". If necessary ask questions like what grows there? who lives there? and then the children is drawing. The teachers ask questions about the pictures, so she will be able to help the child during the presentation if necessary. When the drawing is ready the teachers saves it to the tablet. When all the children have made the drawings, the teacher prints them out. The drawings are put on the wall. The child goes to his/hers drawing and introduces it to the others. If necessary teacher helps. Afterward there is a discussion what is forest, what grows there and who lives there.


Activity 2: Hike to the forest. Teacher gives the treasure bowls for everybody. Each child has to collect what he/she thinks is exiting (plants, rocks, branches, cones, bark and so on). When they are ready then they have some free time to explore the forest. Back in kindergarten the activity continues with small groups outside under the roof area. The child picks one Y-shape branch with twine yarn. The teacher asks then to choose materials from his/hers treasure bowl to twine between the yarn (from bottom to top and from side to side). And ask for teachers help if needed. After everybody are ready they explored the art works together. Then they pick one treasure to investigate further in the next activity. They all decided for the pine cones.
Activity 3: Another hike to the forest. Teacher shows pictures from a pine tree and children have to find it in the forest. They compare it to other coniferous trees. Now teachers asks them to collect only pine cones for the next activity.

Inside the activity continues with experiments. They say that you can predict weather with the pine cones. So they tried it out. Some of the pine cones were put to the water (to hot and cold water), some pine cones were left to dry on the windowsill by sun and some went to the dryer. After the lunch break and little sleep, they explored what had happened to the cones. They found out that in the water the pine cones stayed closed, and the ones under the sun and dryer had opened. So if the pine cone is closed it means that it is wet weather. And when the pine cones are open then it is dry weather!

Afterwards everybody made lovely pictures for the mothers from the pine cones. The teacher cut the cones to suitable peaces, the children colored them and glued them with hot glue on the base from plywood which was also colored. Behind it they glued lovely things that the child had said about her/his mother.

In the next stage, we look at the branch, touch it and smell it. The children try to draw after the branch they have seen. Children draw lines with a brush and then make sheets by pressing with a paper towel.
The related activity lasted for a week.
Activity: Look, our forest!
Theme: Forest as our living environment. Protective attitude towards nature.
Children age: 2-3 years
Objectives: The child shows and tries to use proper words: front, top, side and back; A child prints with a paper towel and draws lines with a painting comb; The child knows that the forest is the home of a wild animal. The child knows that wild animals live in the forest.
Used materials: Small wild animals: tit, wolf, elk, rabbit, wild boar, fox and bear. Kinetic sand, staggered branches, cones and wild animals. For artistic activities: blue and yellow paint, a comb brush. The next day: brush and paper doll, brown color and light green color.
Activity:
We go for a walk in the woods with the children quite often. We asked the children what they think is the forest? The children knew that there were trees, animals, birds in the forest. Then we started discussing from the beginning - What is a TREE. We learned that the tree has branches and a leg. The trees look different in winter and summer. The children thought that the trees were green and brown. The children and I went outside to see the trees in our yard.
In the group there were staggered birch branches, we looked at them and named them: branch, leaf. The branch was brown and the leaf was green.
After the morning round, the children were divided into activities: art and mathematical play.
Then we look at what the trees are like. Same know that the tree has trunks and branches. Leaves come to the branches. The leaves are yellow.
Art: drawing a forest: a child spreads yellow and blue with a comb brush, we get green. We let the work dry and continue the next day.
Math / game: animals on the sand. Inside the sand are branches, cones, like a forest. We agree that there are branches and cones from the game. Let's start putting the animals in the forest together. The child names the animal and tries to say where he puts the animal: I put the fox behind the elk, I put the piglet in front of the tree, and so on. The aim is to play with the children and thus improve their vocabulary and sentence structure. In the game, it also happened that the animal goes to another animal and says hello to him!
The youngest group talked about the seasons and how the trees look in the spring, summer, autumn and winter. They made a weather calendar on the board so they could also observe and make notes on daily basis. They put photos of the forests in different types of weather like sunny, rainy, snowy, cloudy and windy and then they would look out of the window and compare what they see outside with the given photos.


